How to repair a puncture wound caused by a thorn.
Usually a thorn does not destroy any of the strength of the fabric. It just tends to move the seal out of the way allowing for the air to come out. Often they are sizeable leaks, but you may keep pumping the boat if you like so you can do this repair at home. It is a pain to keep pumping on a long trip, but this patch method results in a repair that you cannot see.
First you will need to identify where the hole is. Do this by using a very soapy bare hand. The hole is small enough that you may not be able to see it, but it may also be losing enough air that you will not be able to see soap bubbles. Use very soapy water. Move your hand over the surface till you find what feels like a rough spot. To me it feels like there is something stuck in the tube. However when you look nothing is there. What you are feeling is the air escaping in a tiny stream that blows the air by so fast it may not even bubble. Put your finger on that spot, and now you will see the bubbles.
Use a Crayon to circle the area. Sharpie will not come off. (remove crayon from PVC Urethane with Enamel Reducer or Xylene, and from Hypalon with Acetone. They do not affect surface finish of these respective coatings)
Maneuver your boat so that the hole is at the bottom of the tube. This may take some interesting engineering. The hole has to be 12 inches off the ground. Please see the diagram.
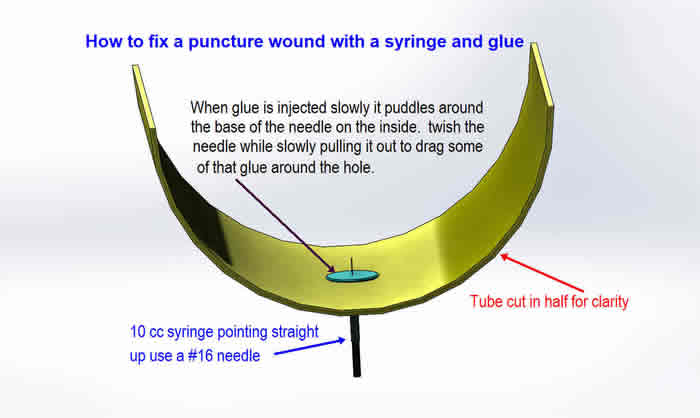
Before you stated you should have obtained a 10 cc syringe, and a #16 needle from the local Feed store or Veterinarian. This is what you will inject the glue inside of the tube with. #16 is a descent sized hole for the glue to go through, but your glue needs to be fresh enough so it will go through that hole. Thickened glue should be tossed.
Put the needle on the empty syringe and insert it up into the hole. You should have moderate pressure. Enough to make the tube firm, but not rock hard. More on that later. The needle should point straight down and this will indicate that a puddle will form around the needle on the inside of the tube.
Unscrew the syringe from the needle and fill the syringe with 2 part cement, Clifton or Staybond PVC/ Urethane Adhesive. (A quality contact cement for Hypalon)
Screw the syringe back on to the needle.
Inject the glue very slowly with the needle pointing straight up, and the syringe pointing straight down. The idea here is that the glue will flow out of the needle and down around the base of the needle on the inside of the tube. The glue will puddle up around the base of the needle. Remove the needle by spinning it as you pull it out. This will help Drag some glue into the hole and help seal the hole. There may be some glue squirt out. If so you can remove some pressure out of the tube. The glue should stop coming out. When it does quickly wipe it off.
Allow the repair to set for 2 days (4 days for hypalon) of cure time at a pressure just low enough to keep the tube shape and not let the glue on the inside run away from the hole. Then inflate and deflate that chamber with a shop vac 3 times to remove all the volatile organic vapors from the glue. You are done.
Return to the Related Information Page -30+ years of JPW info
home | products | pictures & information | find a dealer | river stories & testimonials | related info | FAQ | contact us
Order inquiries: shop.jpwinc@gmail.com
Custom & Prototype inquiries: pschoser.jpwinc@gmail.com
© 2011 Jack's Plastic Welding, Inc
Toll Free 1-800-742-1904
P. 505-334-8748, F. 505-334-1901