|
Using Our Adhesive for Inflatable Boat Repair This page should give all the information necessary to perform effective repairs on many types of inflatable boats. We still recommend the use of contact cement on hypalon, but we do include how to interface it with our adhesive so that PVC parts can be applied to it. The Main Topics on this Page
Technical Comment Before Reading This Material Have patience. Let the glue cure. UR1087 Glue and LA4009 Accelerator WARNING: Use caution when working with this adhesive. Be careful with hot objects. Keep MEK and glue off of skin. Avoid breathing vapors. Use only in a well ventilated area and away from any open flame, including gas appliances equipped with pilot lights. In case of eye contact, wash eye with running water for 15 minutes, and call a physician. If ingested, call a poison control center. Give water or milk as a dilution agent. Glue is urethane based. Evaporative product (80%) is toluene and MEK. Accelerator contains POLYisocyanate This glue is the most effective PVC glue on the market today. It requires some care and caution in it's use. Vinabond can be used for field repairs, but will reactivate with heat. If you understand the principals of heat transfer with this glue, we recommend it's use in the field. The biggest problem that I see with repairs is the inability of the repair person to be patient. Granted that sometimes it is not possible and time schedules need to be met, but most of the time on really difficult repairs that are done in the shop, patience is a virtue that needs to be noticed. If you doing a really difficult repair, that needs to bond well and have good adhesion immediately, or if you are gluing to encapsulated Urethane material, try putting on two coats of glue, and then going to bed and putting on the third coat in the morning after reactivating it with damp MEK cloth. This gives the glue a chance to bond better to the coating without the chance of the glue pealing off of the PVC or Urethane, or the PVC or Urethane pealing off of the fabric. These coatings will get soft as a result of the adhesive attacking the coating chemically. This is because the evaporative product is usually a melting agent for the coating. That is how it adhesives work. Gluing Neoprene and Hypalon Please note that we have had good success gluing directly to hypalon. However there is an age bonding process that must take place. For this reason, we recommend the interfacing of these adhesives. Mixing Instructions Pot life of the mixture is 8 hours. Do NOT mix more than you will be able to apply in 8 hours. Reactivation time is approximately 8 hours. Best results are obtained by applying the patch between the first and second hour after the last application of glue. Reactivation Reactivation with Heat Transfer What is Heat Transfer? When learning patch work with this technique it is advisable to have a large test patch to help determine how much heat to use. Test patches allow you to do a dry run on a piece of fabric to see how this system works. Glue Procedure
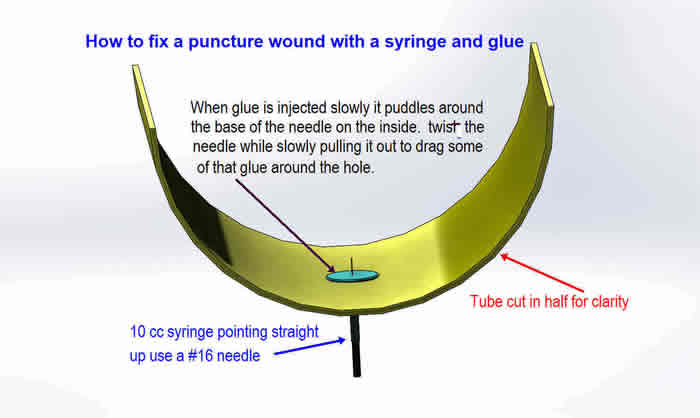
NEVER USE A SILICONE PROTECTANT ON AN INFLATABLE BOAT. Using Armor All or some other type of silicone protectant will make your boat impossible to repair, and in some cases have led to rapid deterioration of the adhesive holding it together. This happens on all fabrics. Use of 303 protectant has been proven safe and effective. It has no silicone. Interfacing Adhesive For a Hypalon to PVC repair We have been testing the concept of interfacing glues so that hypalon can be glued to PVC. We have determined that our adhesive UR 1087 will work quite well. However there is a little strength gained with the use of contact cement on the hypalon. In fact the UR 1087 sticks so well to the contact cement that it will peal it right off of the hypalon in some cases. We feel that you can't get a better bond than that. The secret to a good bond is how well the Hypalon is buffed. This is a lot of work, but should be done carefully, and completely. No extra care need be given than in a normal Hypalon repair. To apply a simple PVC drop stitch chamber to a Hypalon floor simply buff the Hypalon real good as you would on a patch. Use two good coats and wait one full day for the contact cement to cure. Then follow the directions for using UR 1087 with the exception that the glued hypalon does not have to be prepped. The UR 1087 will chemically bond to the contact cement because they both use toluene as an evaporative product. What is great about using UR 1087 is that it will go inactive allowing the repair person to move the parts around so that they can line up properly. (Be sure to use a test piece to ascertain where this point is) Then heat can be applied directly to the glued sides, or to the outside. In the field we prefer a pan of boiling water to reactivate the glue. In this way the floor can be placed inside of the floor of the hypalon boat, and glued in place after it has been properly located. After the UR1087 has set for a couple of hours and is inactive, place the inflatable floor inside of the old floor (previously glued) and then align the pieces. turn the whole thing upside down on saw horses so that the entire weight of the boat is resting on the inflatable floor. Check alignment one more time. Smooth the bubbles out to the edge. Remember that it is still inactive, and it will not stick. heat the hypalon from the back side of the floor, and allow the heat to soak through the layers of fabric. Smooth out the fabric by hand and then use a roller or a dulled putty knife to apply pressure to obtain a good bond. Try to allow the adhesives to age for a week before using. However this is not absolutely necessary. Straight Hypalon or neoprene repair For hypalon repair: Preparation of the material is very very important. Buff the fabric with 36 or 60 grit sand paper. One of my favorite adhesives is a piece of an automotive sanding disk. Go down to the local Automotive Store where they carry painting supplies and ask for a 36 grit open coat sanding disk. It does not matter how big it is because you are going to break it into pieces anyway. These pieces are stiff, and they are easy to use to buff the material. If you avoid the use of power tools, then there is little chance that you will go through the coating and into the fabric. Buff the fabric until all the shiny spots are replaced with deep scratches. Then buff the fabric in the other direction so that the scratches go the other way. With Hypalon there needs to be as much surface area as possible for the glue to hook to. Do this to the patch too. If there are any spots that are not well buffed, it will not stick. After buffing, brush the rubber dust away with a dry bristle brush. DO NOT wash the patch area with solvent like some recommend. Washing will only decrease the effectiveness of the bond. Patience is a virtue. After proper prepping, apply contact cement. Use the kind that you get form the hardware store. Weldwood works well. It is important that the cement that you use be the flammable kind. That means that it has toluene in it. Apply an even coat, brushing in the same direction. Do not over brush it. If it puddles up a little that is OK. Now Go to bed and don't mess with it until the next evening. 24 hours! The next day put a thinner yet not too thin layer of cement on. The cement will go on easier, because it sticks very easily to the cement that you have already applied. If there is a milky color on the surface of the glue use a hair dryer to heat it up slightly so that the milky color disappears. This milky color is moisture that is forming on the patch. By gently heating the moisture is driven away, and you can apply the next coat. Do not allow the glue to get hot enough to bubble. Remember this is day two. It should be well cured glue by now. Wait after the second layer is applied for at least two hours, and use the hair dryer technique again if necessary. Do not worry about the glue becoming too dry. Applying the parts when the glue is too fresh is the number one mistake that is made when first learning to repair. if there are thick runs or puddles of glue, let it dry over night again. Apply the patch. This is contact cement, and it means it. If you misalign the patch, and you have let the glue cure out properly, your patch will stick where it is put. If you must remove it you can use an eye dropper full of enamel reducer (xylene) or Toluene to reactivate the glue and pull the patch up. at that point you must re glue and wait again. DO NOT rebuff. Glue that is too dry can be reactivated by using a rag dampened with toluene or xylene. Therefore it is possible to reactivate your glue after a week or even a month. Try to finish the repair one week before you need the boat. It takes this type of contact cement one week to reach 70% strength, and one year to reach 95% strength. Advanced lessons: Repairing Small Punctures With a Syringe. In the Southwestern U.S. Puncture wounds are common when boats are rolled up in the goat heads that grow along the river. For this reason it is a good Idea to check first to see if there is any low lying greenery that has the seed that we call a goat head. These nasty little seeds are a tetrahedron. That means that any way it lies on the ground there is always one thorn that is sticking straight up. These are so abundant that many bicycle companies use a plastic liner on the inside of their bike tires to keep them from puncturing through the tire. We have also had puncture wounds from Russian olive trees, and even thumb tacks and wires shot from wire buffing wheels in the shop. If you have a puncture wound that did not rip the fabric, there is no reason to put a patch on the outside of the tube that will decrease the value of your boat. Follow these simple instructions. .Purchase a Syringe that has a #16 needle, and a 10 cc syringe. (available at veterinarian and feed stores) Place the needle through the puncture hole. Position the boat so that the needle is at the lowest point. The boat must be inflated so that the inside of the boat is not glued together, A light inflation will usually do the trick.. It is important that the glue be allowed to puddle up around the hole so that air pressure can force the glue out of the hole and help seal it up. It is also important to be able to remove the plunger and leave the needle in place in the boat. In this way the plunger can be filled several times to insure enough glue in the affected area. Use a paper cup to mix a small amount of glue, and then pinch the top of the paper cup to make a spout. The glue can be poured from easily and slowly into the top of the syringe while holding a finger on the needle end with the needle off. Replace the plunger, and allow air bubbles to rise to the top before placing the syringe and the needle back together. This is a fairly messy operation. Gloves are recommended. Be careful to hold the needle and syringe together as the plunger is operated. It is easy for them to separate and spray glue on the boat. Look to purchase needles that actually rotate to lock in place on the syringe. Have a rag handy to clean it up quickly before it can do any damage, just in case. When pulling the needle out twist it so that the needle itself helps drag some glue into the fabric to help seal the hole. The trick is to form a puddle at the base of the needle as in the image below.
There is a marvelous solvent that is called THF. It is the major component in PVC pipe cement. This solvent will melt PVC and Urethane. You can use this melted compound to actually coat bare spots on a boat, or to help seal up pin holes in the material. For Urethane, you must melt the coating off of fabric that you use for repair. This works well, because the color can be matched exactly. For PVC we often recommend that a customer buy some vinyl tubing and cut it into little pieces and apply the solvent. The resulting mixture looks like transparent spaghetti O's. Desolving of the materials must be done 1 day prior to use, and you must use plastic gloves (food handlers gloves made of polyethylene) to remove the fabric form the solution. Simply grab the fabric and pull it between your fingers (with plastic Gloves on) to squeegee the softened plastic off of the fabric. Remember that this solvent will evaporate fast. Keep it in a covered container, and always be careful with solvents. Do not use them around open flames like water heater pilot lights. This is strictly an outside activity. Thin solutions of this material (Tomato soup consistency) with multiple coats. will give the best results. Have enough solvent in the solution so that the mixture is allowed to melt into the existing coating. |
Order inquiries: shop.jpwinc@gmail.com © 2011 Jack's Plastic Welding, Inc
|
|