Lace in Drop stitch floor for 2017
Why are we looking at a redesign of our drop stitch floors?
There is a lot of information in this page, and I though that you may just want to see the new floor design before you decide if you want to read more or not. So here it is.

it is a little hard to see, but this floor had to be built in 3 sections because it actually kicks 8 inches in the front and 8 in the rear.
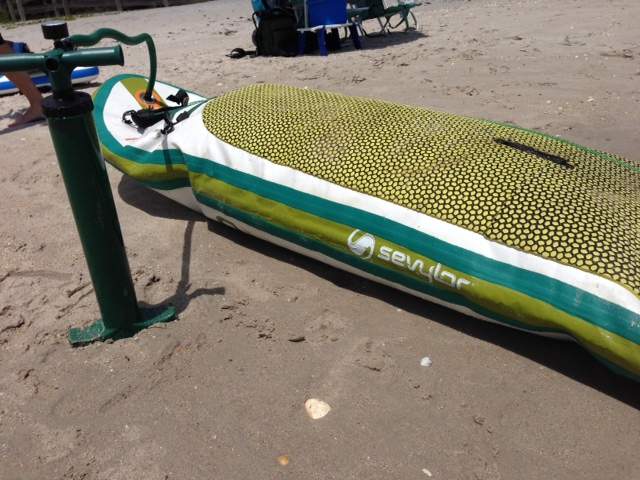
We build a lot of boats that were used for fly fishing, and they seldom were used in places where the silt content of the water was extreme. We also built a lot of boats that were used in very silty rivers like the Colorado, Green, Delores, and San Juan. Some Self bailing rafts in the early days, had the inflatable floor glued all the way across to 35 or 42 oz. material. Eventually we came to the conclusion that it was a good Idea to have the floor removable because it was the most venerable part of the raft. Later on, we found out that Drop stitch is some very durable stuff. The drop stitch that failed, was glued to a cover material. (Sometimes it is called laminated to throw us off.) It failed because the glue got soft and failed over many years of use. This Sevelor Drop stitch paddle board shows the same defect. Where the laminations (glue) on the drop stitch let go. A bubble formed, and the floor failed. In one circumstance, this happened to a floor for a Dragonfly, and to 2 other 14 ft. rafts, that was used for 20 years in New Zealand, for the US fish and wildlife service, and a university rental program. Those floors were replaced with the new drop stitch, and the boats go on.
One time we went down the Salt River and my Friend Jose Trejada took a Dragonfly raft. The inflatable drop stitch floor was not glued to the main. This time the main floor material was 35 oz. material, and the 42 oz material is 50% stronger. We did have a hole in the main floor, but the drop stitch was unharmed. We could not even find wear marks. I bring this up because having the main floor unattached to the drop stitch floor is a good way to keep a hole from getting into the drop stitch floor. But more about that in a moment.
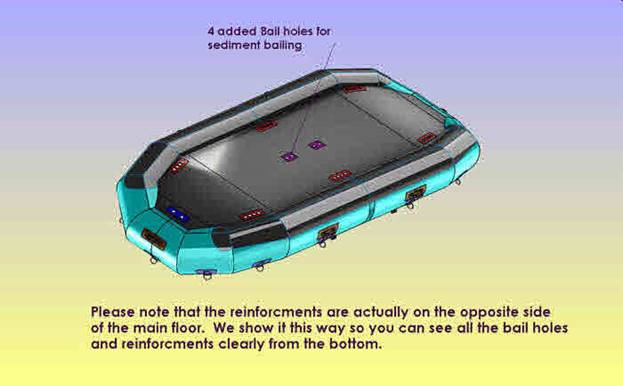
We had some problems with rafts accumulating sediment between the main floor and the inflatable floor on rafts where they were not hooked together. This past year we had some high water and high sediment experiences. Specifically High water on the San Juan, and the Delores with 2 separate boats. We solved the problem with this solution. (Follow the link to read about the problem in more detail) We provided Bail holes in the middle bottom of the raft floor and reinforced them against rips. This allows the sediment to flow freely out the bottom of the raft.
Errol did extensive research into the attitudes and Ideas from some of our very best outfitter customers, and we came up with this idea of the lace in drop stitch floor. It is what we consider the best of raft floor design. Where the inflatable floor is laced into the main part of the raft, yet can be tied tightly up to maintain the other performance characteristics we have grown to love.
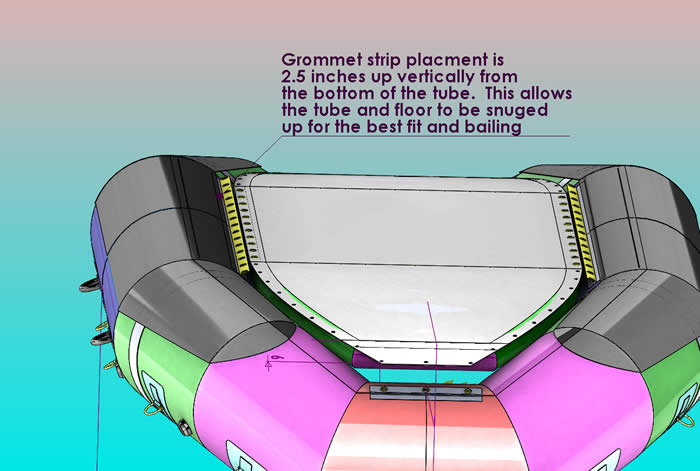
This image shows the relative location of the gromet strips on the raft in relation to the inflatable floor. The inflatable floor is located 2.5 inches up vertically from the bottom of the main tubes, this provides tracking effect with the main tubes, while giving good flotation from the floor as well.
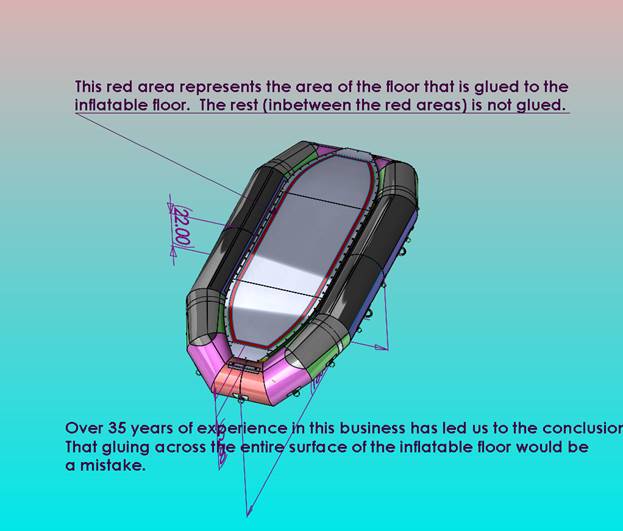
At this point you may wonder why the rest of the 42 oz. floor is not glued to the inflatable floor. If you were to go over a sharp enough object to cut the main floor, The 42 oz. floor will gather in front of the sharp object as it moves across it. If it is sharp enough it will cut through, but because the inflatable floor is not attached, it will have a more difficult time getting through that second layer (the drop stitch) than it would if it were glued to it. This is because the 42 oz. material is gathering in front of the rip. Honestly all of our floors that were glued on all the way across, that we repaired, never had a hole. So this may be a moot point, but our experience shows us that this is a reality. (Remember Jose’s experience on the Salt River.) If the floor does get a hole in it, there is not so much of a chance that the sediment will accumulate in that spot. However if it does, it can be cleaned out, and repairs can be made. Simply cut open the main floor and either weld or glue the inflatable floor together. If you get a hole in the inflatable floor when it is glued to the 42 oz. material, it is much more difficult to get that sealed up. The 42 oz. material is super strong, but that means that it can let air travel down through the fabric. If a rip goes through both surfaces, and they are glued together, the only way to repair it is to glue the top 42 oz. surface. When that is done it exposes the fabric under the patch in the 42 oz. material to the air pressure in the floor. The air will escape out of the floor traveling down through the heavy fabric, between the coated surfaces. We call this Air Wicking. And this leak will be virtually impossible to fix unless you can pull the 42 oz. away from the drop stitch, and repair each individually. If the boat is new, less than 10 years old, then you may not be able to pull the drop stitch away from the main floor, without ripping off the coating on one side or the other. Finally because the main floor is only glued to the drop stitch for 1.5 inches around the perimeter, it is unlikely that portion will be ripped because the floor is recessed up inside of the raft to give it hull speed and tracking, and when going over a sharp object sideways, that portion of the floor is likely to have less damage.
We believe that this is the best combination of design on inflatable floors to date. So let’s run over the benefits.
- Self-bailing floor that kicks up and is held in place against the main tube through strap or rope tension through grommets.
- Increased hull speed with kicked up drop stitch floor patterning. Makes for a more hydrodynamic floor.
- Easier repair than other kinds of inflatable floors. Keeping in mind that some of these floors have lasted for well over 20 years, and with welded technology they can last as long as the fabric is not compromised by UV radiation.
- 27 years of design and testing have gone into the final development of this concept. With loads of great feedback from customers. Some of that feedback was form repair of floors over 20 years old.
If you are concerned about having places to tie gear down to the floor, simply loop a few straps through the grommets or floor lacing when the floor is deflated, to get the tie down spots you need. That is how we will keep the thwarts tied in, and adjustable too.
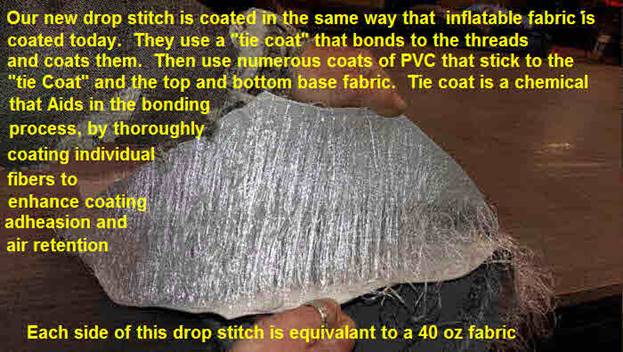
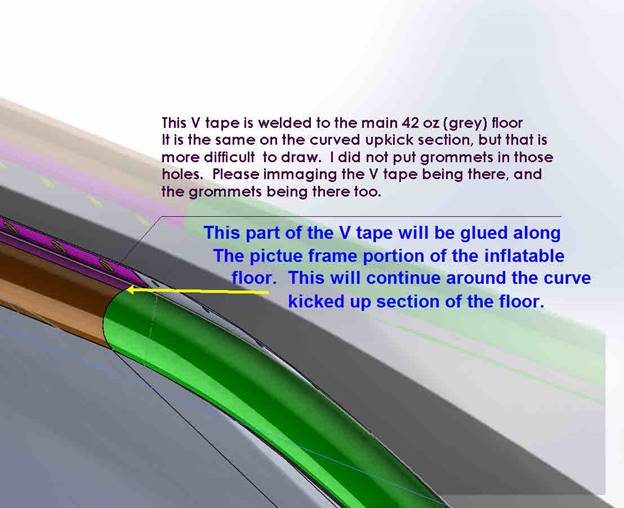
This last image is a detail view of the floor section. The grey material is 42 oz fabric. The purple material is an 18 oz. V tape. It is difficult to computer model the grommets in a compound curvature that is the floor as it curves upward. I am asking you to use your imagination and put the v tape and the grommets in place when you look at this. The green section is the upkicked and curved dropstitch section.
Thank you for reading this, because if you got this far, you are a very serious rafter indeed. Please email me with any questions or ideas on where our logic may need improvement. After all we do not get out on the river as much as we would like to, but when we do we tend to notice things other folks don’t.
My email is ejkloepfer.jpwinc@gmail.com
Sincerely,
Jack Kloepfer
home | products | pictures & information | find a dealer | river stories & testimonials | related info | FAQ | contact us
Order inquiries: shop.jpwinc@gmail.com
Custom & Prototype inquiries: pschoser.jpwinc@gmail.com
© 2011 Jack's Plastic Welding, Inc
Toll Free 1-800-742-1904
P. 505-334-8748, F. 505-334-1901